Stone setting in metal clay

Prepared to set stones. Drill bits and stone setting bits alongside corresponding 3, 4, and 5 mm stones

Recently all senior instructors for Art Clay World were asked to create 4 pieces showing their craftperson skills with Mitsubishi’s silver clay. The curriculum had changed since my certification as a senior instructor almost 2 years ago, and 4 new projects now replace some previous projects in the curriculum. Those 4 projects were thus a new requirement for all senior instructors who wished to retain their certification level.

One of the 4 pieces was required to be a hollow form brooch with faceted stones in three different sizes set into the clay after the clay dried. The piece also needed to have twice as many empty drilled holes as stone filled holes, 50 percent or greater of the surface area needed to be mirror finished, and there were more requirements…. Since this is a class demonstration piece which will sit in a box unworn, I used lab created faceted rubies and a lab created faceted amethyst.

stones set in skills test piece
Stones set in skills test piece: 3, 4, and 5 mm stones

I was happy to put my traditional stone setting workshop skills to work on metal clay. The skills for sizing and shaping a setting translate directly from cast or fabricated metal to dried metal clay.

Earrings that Grew on a Tree

Sterling silver earring tree and protective finger mitts

After setting oval white topaz stones in a new earring design, I decided to also set blue topaz and garnets in the same design; and to make a pendant with one of those stones in the ‘same’ design.

So, I treed up some waxes after adding more of the little ball features onto the wax earring form. Adding more was a necessary step, since the four of the balls kept coming off during the wax removal from the mold.

Using a cut disc I’m removing the cast sterling earring forms from the tree one-by-one. The earrings will need to be custom fit for each stone, and the earring backs and pendant bail will be soldered on.

Where it all starts: wax carving and the white topaz

In order to make an 18kt gold version of the white topaz earrings, I am recarving the waxes so that I can minimize the use of metal. The original earring forms were made to be large enough to custom fit different oval stones by grinding away sterling silver to be recycled later. A one mold fits most approach.

The gold wax forms will be custom fit for two specific stones; so I’m basically remaking the earrings from scratch. It’ll be nice to incorporate in wax the things I’ve learned about creating the stone seat and fitting the stone for a nice flush setting.

Custom Tools

As mentioned on May 18th, the flush setting technique for setting large oval stones requires quite a bit of strength compared to setting round stones in the 2 to 4 mm size range.

And, it also requires these special tools made from a finish nail or a flexshaft tool mandrel.

Polished Off

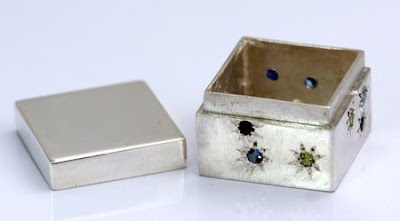
I practiced bead setting for the first time on this 20 x 20 x 18 mm sterling silver box. I’d cast the box years ago just to see if I could, then came up with the idea of setting tiny stones randomly all around it. As they often do, the idea morphed into different sizes and types of stones. I ended up using 2.25 – 3 mm sapphires, peridots, and aquamarines instead of garnets as originally planned.

While I was polishing up the box, I also polished up the white topaz earrings I flush set last month. The larger oval stones require much more force to flush set than 3mm round stones! Below is a picture of the earrings before the sterling silver was polished.

Next: I’ll finish my piranha skull. The Menlo Park Library will be featuring work from the members of the Metal Arts Association of Silicon Valley. I submitted four necklaces for the show and was asked if I have any larger work to add. The 13″ tall wire skull outline I started making in Tom Hill’s wire sculpture workshop should do the trick. Below is the 3″ high shellaced skull which was used as a visual guide.

Stop by the library to see the exhibit any time in the month of June. The display case flanks both sides of the lobby entrance sidewalk before the doors; so you can view all the metal artwork 24/7.