Nami-shibu-ichi

When Pat Accorinti floated the idea of creating an alloy with metal clay as a supplement to our demonstration with Mitsubishi’s quick fire copper clay, Kathleen Gordon and I were on board immediately. Pat had read Hadar Jacobson’s blog post about creating an alloy of copper and silver by combining PMC+ with her formulation of Quick Fire Copper Clay. Pat had also read the Art Jewelry Magazine article on shibu-ichi alloys which Hadar mentioned in her blog post, because we’d all just recently received our copies in the mail.

I had Mitsubishi’s clay products on hand, and I have a wonderful book on Japanese patinas which lists shibu-ichi alloy ratios and shows patina on some pieces made with shibu-ichi.  Once we decided on a ratio, I calculated the amounts of silver metal clay and copper metal clay needed to mix the nami-shibu-ichi alloy of 25% silver and 75% copper.

Nami-shibu-ichi samples (created w/ copper and silver metal clays from Mitsubishi)

After Kathleen and Pat mixed up the clay alloy, Pat created samples to match the copper clay samples she’d made almost a month earlier. The domed circles of nami-shibu-ichi clay were then split up for various treatments and finishes by the three of us. Kathleen fired her set of samples immersed in carbon in a kiln. Pat fired her samples by torch and in a kiln without carbon. And, I kept some of the torch fired samples to patina. Pat also took some of the samples to enamel on and to paint with purchased patina solutions.

Sea Salt, vinegar and ammonia patina test on Nami-shibu-ichi sample (alloy created w/ copper and silver metal clays from Mitsubishi)
Sea salt, vinegar and ammonia patina test on Nami-shibu-ichi sample (alloy created w/ copper & silver metal clays from Mitsubishi)

Results Summary: the quick fire clays seem to sinter reliably in the kiln. The nami-shibu-ichi does take patina differently than pure copper. Care needs to be taken to avoid the introduction of air bubbles in the clay alloy mixture. Torch patina and kiln patina on the nami-shibu-ichi were very popular with the demonstration audience.

Electroforming – Part 1

Electroformed etched glass and organic objects, and objects to be electroformed
Electroformed etched glass and organic objects, and objects to be electroformed. Artist: Susan Shahinian

My friend Susan Shahinian was kind enough to give an in depth demonstration of electroforming to the local metal clay guild, her second time doing so. When I saw the first demo I didn’t take many pictures; this time I did. And, I took note of the equipment needed to electroform, so this first post is dedicated to sharing that information. Note that these lists are short and there are many places who sell equipment and supplies for electroforming.

The priciest piece of equipment you’ll probably want is a bench DC power supply with which you can vary the current and the voltage to the piece you are electroforming. The power supply is also known as a ‘rectifier’ or ‘linear variable power supply’ or ‘full wave rectifier’ or ‘variable bench power supply’. You can find instructions to make your own AC to DC converter. Off-the-shelf units, such as the one in the photo below, make it easier to get started as they are already built and tested.

Susans bench rectifier
Susan's bench rectifier

Rectifier Suppliers

  • Marlin P. Jones & Assoc, Inc
  • Shor International sells rectifiers separately and within a full electroforming kit
  • Caswell Inc has a web tool for figuring out current, and thus rectifier, requirements based on metal and size
  • Delta One Lapidary
  • Dalmar Professional Models – their web page explains what a rectifier is and how it works
  • Mastech – thanks to my friend Mona Clee who gave me the name of this northern California manufacturer
  • Wierd Stuff is a great place to find “as-is” electronic components and overstock items
  • Dalmar has good information on rectifiers they and others sell
  • Contenti sells rectifiers as well as electroforming accessories, and consumables for electroforming

Plating Solutions (in addition to the suppliers above who also sell the solutions)

Water based conductive paint for copper plating
Water based conductive paint for copper electroforming

Conductive Coating Suppliers

Online Forums and Resources for Assistance with Electroforming Issues

Kits

Tips and Troubleshooting

Books on Electroforming

More Volts & Amps

When it was time for more electrolytic etching I decided to try the trickle charger as the source. Well . . . whoever named it was accurate: trickle means trickle. Even the C batteries caused more bubbles in the saltwater when they were hooked up. My friend Pat had a great idea to check the local electronics store for a battery that would suit our need (desire) for speed. Plan B meant a perusal of the battery aisle. I now know why UPS units for computers are so heavy – they have all these dense batteries inside of them.

A guy in the test/measurement department obliged us and broke out some new leads to test whether the chosen UPS battery had a charge. Yes, it did. And, it works very nicely. The good news is that when I drain the battery, I can hook it up to the trickle charger and recharge it. So, the trickle charger will be used indirectly after all.

Pat had a great idea to hide the leads behind a piece of wood to reduce the salty moisture that could deposit on them. The 18 gauge copper wire holding the cathode copper kept being etched away and dropping the etched copper piece into the solution.

After doubling the copper wire, in order to obtain double the time we had before the copper fell into in the bath, I remembered that I’d covered the leads with electrical tape before.

The yellow duct tape masked off the ends and back of one of these bracelet-to-be copper pieces. I kept taping and covered the leads, giving the copper all the time in the solution that I wanted. After three etches, the solution slowed down a bit, which was perfect because the bracelet-to-be pieces will be forged so they need to keep a decent amount of thickness to them.

On the above piece I covered the entire back and edges with rubber cement, which held up well in the saltwater solution.

I was in a rubber cement mood, so all of these textures were the result of applying rubber cement and then scraping it off with a toothpick.

Copper and Bronze Pieces, and Auto White Balance

In January I posted a picture of bronze and copper metal clay pieces drying on a hot plate. The pieces were fired and this is how they looked before I began to patch the bronze pieces. Note that the bronze clay cracked much more than the same shapes would have in silver metal clay. The bronze clay was from the original batch handed out in mid-2008 by Rio Grande; many people report that it has improved since then.


In my previous post I mentioned that the copper clay was very moist and hard to work with. The results show that it kept it’s general shape very well, yet the weight of the clay itslef pushed some of the texture flat. The inside of the round part of the toggle illustrates this. Since I tried Hadar Jacobson’s copper clay, she has started selling the copper clay as a powder (and also bronze clay powder) which you can mix yourself to the consistency you desire. Note that the absence of drying/firing cracks in the copper clay. The bottom two pieces are made from copper clay, the top five pieces are made from bronze clay. 

As I took the above picture, I decided to play with the Auto White Balance (AWB) feature on my camera. There are many settings such as ‘daylight’, ‘tungsten’, and ‘fluorescent.’ The choice of which AWB to use made a big difference in the photos. The photo above was adjusted in Photoshop (TM) in order to match the white background a little more to what it would be with proper lighting. View the unedited photos of different AWB settings at this link to see the what a drastic difference the AWB choices make. The pictures were taken late in the afternoon with indirect natural light and overhead full-spectrum bulbs.

Bronze & Copper Toggles

Last night I spent several hours with my good friends Pat and Kathleen playing with Bronze and Copper metal clay for the first time. They are prepping for a hands-on workshop on Feb 8th in Los Gatos for the local metal clay group (SFBASCG.) 


Both Pat and Kathleen had played with the new clays already; in fact Kathleen has made many many pieces with the bronze clay. As for me, well – I have now opened, and used, the free sample pack of bronze I received last summer!

One of the toggle clasps might look nice with a hand knit copper bracelet that’s been sitting on my bench without a clasp for quite a while….

As a bonus, I talked with Pat’s newly certified diving husband about his first dive trip. We also talked about places we’d like to go diving; our lists are both long. 🙂


Kathleen has kindly offered to fire my bronze and copper (product in development by Hadar Jacobsen) pieces for me in her charcoal setup. We’ll see if all the bronze flakes I managed to get on the copper make a difference.

Knitting wire in front of the TV

While watching TV these past couple of weeks, I’ve also been working on some new combinations in knitted wire chain. I tried mixing copper and fine silver wire at the same time, copper only, two strands of fine silver, and increasing and decreasing the size of my loops.

I’m seeing a funky bracelet in this sampler piece. Now it’s time to create the sample where I pull the chain through the drawplate to see how my double strand pieces look once drawn….

Electrolytic Saltwater Etching of Copper

Results from electrolytic saltwater etching of copper


In my days at a semiconductor capital equipment company I made a lifelong friend. When we first met, she was a “process” engineer who etched the dielectric material on silicon wafers; then she etched conductive materials; then she was a product support engineer, et cetera.

A month ago I showed her the Art Jewelry magazine article on etching copper, nickel silver, brass and other materials in a salt water solution using a D cell battery. As an etcher, she was very interested. She’d never etched at home. Her current company (where they have a chemical that etches metal in only 20 seconds) is on holiday break, so this week she’s free to come out and play.

Play we did – in our nerdy way. The local Radio Shack had only one single D cell battery holder, prompting an etching experiment. I purchased the single D holder, and also holders for a single C and two Cs.

We placed two sets of copper anodes and cathodes in almost identical etch setups at the same time. The main differences between the two was the number of C batteries and the resist designs on the copper.

Loooooook at the difference in the water color after a few minutes. The double C setup skipped the blue-green water phase and headed right to the orange water phase of the process. After five minutes the copper had significantly etched. After an hour, the copper was more than ready to be taken out. The single C battery tub etched much slower; after 2 hours the depth of the etch was still shallower than the 1 hour double C etch.

We etched both sides of the anode and purposely ignored recommendations to duct tape the edges – as you can see on Ben’s piece at the far left.


Next time the process will be tweaked a little. Some rubber cement on the lead to the anode. Alligator clips instead of twisted and wrapped wires. Perhaps try a new type of metal. Duct tape on the edges. And, we’ll measure the voltage and current from the single and double C setups and compare to the recommended single D setup.

By the way, we were shocked not to find a molecular orbital diagram of the process on wikipedia! 😉

Patina Experiment Results

As promised…here are some photos of the brass bracelet and copper piece I was experimenting with in October.


I left the brass bracelet in the fuming container much longer than recommended, and the colored patina you saw in October washed off. Now that I’ve pushed that patina past it’s time limit, I’ll revisit it again someday and see how long to fume it so the blue greens stay.

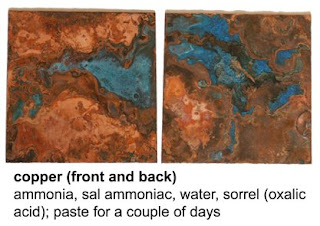
The moist sorrel washed off, leaving nice colors on the copper sample.

My favorite new copper patina is shown below on flat and hammered copper samples. The fuming recipe is comprised of sea salt, cream of tartar, and vinegar.


You can read more about the cream of tartar patina in my “Accessible Patinas” article in the upcoming zine which Catherine Witherell and
Deryn Mentock are publishing in January 2009.

Another fun result from the copper patina experiments is a mottled blue / green from sal ammoniac and tobacco. The results lead me to wonder what would happen if I ground up the tobacco even finer before this immersion process.

Here’s a closeup look at the flat piece after rinsing

Fave New Book

I’m loving the book “The Colouring, Bronzing and Patination of Metals” by Richard Hughes and Michael Rowe. (Click on the title to see the book.)
Since I’m more of a “thanks for the suggested starting point” type of person, for the most part I’m using the endless patina recipes in the book as a very nice place to start. Here are a couple of the things I’ve learned….
When you boil sorrel in water to obtain the oxalic acid, and use the water with some of the now sad looking sorrel, you’ll see the copper in this type of blue mess after about a week:

Stay tuned for more photos of what the pieces look like after they’ve been cleaned off.

Three Pomegranates

I’m pretty pleased with the pomegranates that rose out of the 22 gauge copper sheet brought to my first Chasing and Repousse’ workshop! Davide Biggazzi is an excellent instructor, and yes – he did a small bit of the work on this piece. Nothing like working directly on the piece to show the technique when moving along in the steps of the process…. 

Starting with this outline from Davide, I punched and punched the dots around the tracing paper to transfer the image to the copper sheet.

We worked the back of the piece (repousse’), then switched to the front of the piece to refine the design (chasing). A couple minor touchups were then made on the back and front (by Davide) once the piece had been removed from the pitch bowl.